Monthly Archives: January 2015

1/19/2015, Backboxes, Playfields and Screens, oh, my!

A couple weekends ago, I finished populating the playfield.  While not a Herculean task, it was a little bit annoying since I filled all post holes because they were almost all pulling out and not holding properly.   After the clearcoat, I used a nail to punch the center of the bamboo skewer, than a small drill bit to drill the pilot hole.  It went surprisingly well, and I’m now happy to report that the playfield is probably in better shape than it has been for 15 years.  Here is a quick picture of the populated playfield.

WhiteWood

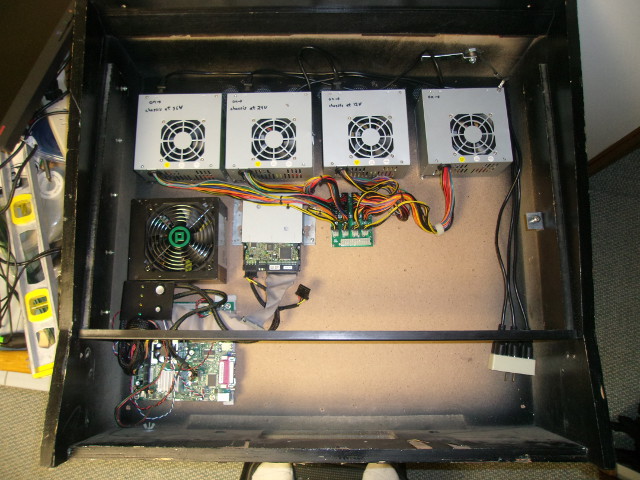
I decided I wasn’t going to fire up the playfield again until I got the backbox in better shape.  A couple weeks back I installed the power supplies, and the MaxPower card that creates my 48V.  (On a side note, Joe just bought a 48V power supply for dirt cheap (around $20 or $25 with shipping).  Maybe the time of creating your own power supply from multiple PC power supplies is over.  That being said, I will not miss it.  Doing it that way requires a lot of extra wires which most of them are unused.)  The four PC power supplies take up the top 1/5 of the backbox.  The MaxPower board takes up a small amount of space just below them.

I was handed back a small form factor PC (mini-ITX based card) that was no longer wanted.  I had that sitting on the side running windows XP, but it was cumbersome to move that around with all its extra stuff.  I decided to rip that apart and also mount that stuff in the backbox.  That includes another PC power supply, the mini-ITX motherboard, and a hard disk drive.  All of that stuff will be removed and replaced with a single Raspberry Pi eventually.

I mounted a speaker panel which also allows the bottom half of the monitor to show through.  The top half of the monitor is going to be behind the backglass and will have a transparent window in the backglass so that I can display images.

I’m having troubles mounting the monitor, but I’m trying to spend a good amount of time to get it right, so that it can easily be removed for “servicing.”  That involves building a bracket of some sort out of metal.  I have the metal left over from the ground that was in the back of the backbox.  Plenty of metal, but I need to make clean 90 degree bends with a good degree of accuracy.  I don’t own a metal brake, so I’m being very cautious.  Here are a couple of pictures of backbox, and backbox without the monitor.

GE GE

Last thing that I spent a good amount of time on these last few weeks is adding to the pinball framework or more specifically to the GenPyCode program.  That takes the rules.txt and generates Python files that are used by the pinball framework.  The generation of all the files except one is complete at this point.  For details look at the Subversion repository check-in.  Within the next week or two, I should have that completed and should be back to being able to start working on the actual rules of the machine.

I have not finished wiring the GI, and it is simply a couple hours of work that I need to do.  Since the lights were so dim, I didn’t feel like bothering, but now with the LED bulbs, I’m hoping to get back to that.  I need to start working on putting the playfield in the cabinet, but that is only after all the wiring is done.

It’s been a busy couple of weeks, but things are moving quickly.  It’s amazing how quickly two weeks goes by, and that deadline of the beginning of July is looming ever closer.

1/6/2015 Backbox, Cabinet, etc

It’s been a busy couple of weeks here at the OPP.   This entry is going to be pretty scattered and I apologize.  Changes are happening to the playfield, cabinet, backbox, and pinball framework.

I’m working on the backbox during the time that I have to wait for the playfield to cure.  Last layer of polyurethane was on 12/27/2014.  Final top coats are normally supposed to be cure for 3 months, but since the playfield is going to be covered again, I’m hoping waiting 3 or 4 weeks is sufficient.

I picked up a backbox on Monday (12/29/2014).  After taking some measurements, I am much more excited.  Right now, if you look at previous pictures of the power supplies, they are all mounted on a piece of plywood.  That isn’t a good long term solution.  After turning on the supplies to see which direction the fan blows and taking some measurements, I’ve found I can mount them at the top of the backbox.  That will exhaust the heat out of the top of the back box as efficiently as possible.  The remaining 2/3 towards the bottom can mount the speakers, amplifier, main controller (aka Raspberry Pi, or mini-ITX board), Max Power board, monitor, etc.  I’m still thinking about how I’m going to mount the LCD screen, but my current thoughts are to use the EMI shielding metal from the original backbox and form some metal brackets that flare out larger than the monitor for easy access.

On the amplifier and speakers, I’ve decided I’m way too lazy to figure out anything for myself.  Because of that, I ended up just following Joe’s lead.  For Christmas, Santa brought me a Lepai amplifier (LP-2020A+) and Lanzai speakers (MX53). The amplifier can be powered using a 12V supply, so that will be connected to the Max Power board which can provide 12V.  Sweet. One less thing that needs to be plugged into AC power.  The controller can also turn the amplifier on/off by enabling/disabling the PC power supply voltages.

Finished my big order to pinball life last week.  It includes all the LED bulbs.  The bulbs cost $57.  The playfield was only $75.  Hmmmm.   I would not have guessed that I would be spending that much money on bulbs, but if it achieves the look that I’m hoping, it will be well worth the price of admission.  The order also contained all the little annoying parts that I was missing:  new posts since many of them are broken or chipped, leg levelers, leg brackets (cabinet didn’t have any brackets on the front), and plastic channel for the playfield glass.  I tried a couple of places to find cheaper parts, and pinball life definitely seemed to have best price/selection.  This is my first order from them, so we will see how they do.  I was hoping this would be the last major order, and the day after ordering, I realize that I don’t have a start button.  That is easy enough to dummy up, but I’m annoyed I didn’t notice it earlier.

Joe is sending me a lockdown bar and a couple other random cabinet parts, so that I can install the playfield into the cabinet.  That’s a pretty big step for the project.

Started re-installing the top playfield parts.  The only annoying thing is that they all have to  be stripped off again to install the final artwork on the playfield.  Of course there is no playfield artwork, but somebody has offered to help.  It is going to be a heck of a lot better than anything that I can do.  I worked two or three days on some cabinet artwork, and in an hour, he threw something at me that was significantly better than what I did.  It once again proves how crappy I am at artwork.

The pinball machine has been entered in a contest.  This gives me a hard end date (7/10/2015- 7/11/2015), and forces me to hopefully get something fully working by early July.  The machine is entered in the Restoration Throwdown Contest (RTC) at the Pintastic New England show.  Here’s the link.  This is the first New England pinball show for quite a  few years and I’m very happy to see somebody getting a show up and running so close to home.  It will be interesting if people consider the Sharpe Shooter III a restoration, or something else.

I was going to hold the post off for a few pictures, but I can add more photos next update.  Seems like there is enough info, and I hate when the information gets too stale.