Monthly Archives: May 2015

5/31/2015, Wet sanding, it’s all good

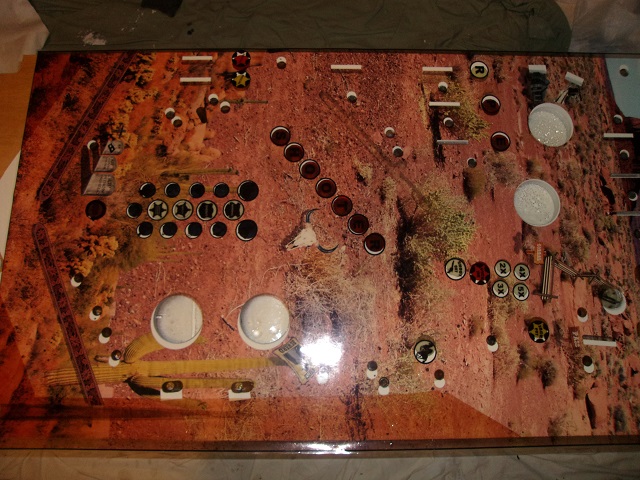
At the end of last weekend I had a playfield with a good amount of brush strokes in the auto clear.  I was a little unhappy with it, and went to pinball league night on Monday night.  After talking to Chip, who has done a lot of auto clear on playfields, he talked me into trying to sand out the brush strokes.  On Tuesday night I went down and spent five or six sheets (each sheet is split into three sanding blocks worth) of 600 grit sandpaper trying to get it smooth.  The sandpaper clogged up quickly, but there was a lot of improvement, but I wasn’t happy.

The next night I decided to try wet sanding.  Wow, what a difference.  Instead of clogging the paper up, it made a “slurry” and kept the sandpaper working well.  When dry sanding, I was spending half my time changing the paper on the sanding block, or using a clogged piece of sandpaper.  As soon as I switched to wet sanding, it didn’t clog up at all.  Within 20 minutes, the playfield was much, much smoother.

I switched from the 600 grit sandpaper to 1200 grit sandpaper.  I added more circular motion when sanding.  Finally I switched over to 2000 grit sandpaper.  When starting to sand, the block offered some resistance.  As I kept sanding, it became easier and easier indicating that the playfield was getting much smoother.

The one downside to wet sanding is it is messy.  Very messy.  It is probably going to be a complete pain to clean it up, but the results and how fast the results occurred make it well worth the mess.

After sanding I used Novus #2, and finally Novus #1 for polishing.   Right now the playfield seems really shiny.  Not professional since I don’t own a buffer, but much better than I was expecting it to be.

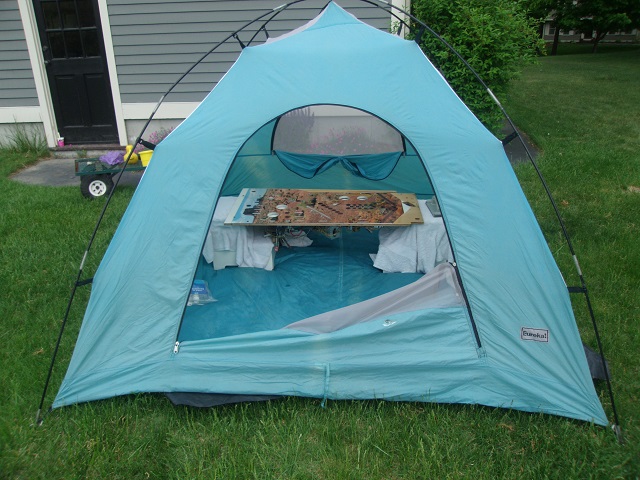
Now the bad stuff for the weekend.  I continue to fight the cabinet.  After installing the glass guide on the side, I found out that the side rails don’t match up with the flipper buttons.  (They are about 1/4 inch high).  I ended up trying to use a sabre saw to shave the wood, but it did not give me a good straight cut.  I then switched over to a circular saw, and that did much better.  The only problem is that I needed to cut off a good amount of cabinet wood so that I could add back a piece of plywood with the channel cut into it.  Luckily all of this work is hidden under the side trim.  After working all day Saturday to get that correct, I was finally at the point where I could try and install the glass on Sunday.

I slid the glass up and found out that the lock down bar interfered with the glass.  Out comes the circular saw again, and a quarter inch gets shaved off the back of the cabinet.  Most of my cabinet problems are caused by the fact that I’m using random pinball parts from random pinball companies.  None of them were meant to work together.  It is only through some amount of  jury rigging that I can get it to work properly.  It is one of the challenges of this project that I wasn’t expecting it to take so long.

5/24/2015, Adventures with Auto Clear

So Friday I picked up the newest print of the overlay for the playfield.  Yeah, somebody finally printed it properly.  Early in the week, I went to a local place to get it printed.  The first print they they made, was too large (eerily similar to the size that I got from banner buzz).  Luckily now they were local, and it was very easy working with them.  After a couple of emails back and forth, it was determined that they had simply printed it incorrectly.  We were never able to figure out why their program increased the size, but it was probably some default setting.  After talking to them on Thursday, they promised me that the new print would be done on Friday so I could work on clear coating this weekend.  Super!  The next print was also free since they admitted it was their mistake.  (Something that banner buzz never did.)  Signs 123 in Chelmsford, MA was the local place that I got it printed.  It is nice to have a local person to deal with when things such as size are critical.

If I was printing the playfield overlay again, this is how I would make sure that it is the correct size:  I would change the canvas on the image to a whole number of inches, so when entering the size in the banner buzz website, it is exact.  It doesn’t matter if the edges are blank, it should simply be printed clear.  Adding a little area around the edge is also helpful, so when installing the overlay, you have a good location to hold the overlay without getting oils from your fingers on the glue.

Once again, used the wet method.  I tried using two people to line it up, (which worked well for the side cabinet art), but was not necessary for the playfield.  After wetting the playfield, and the back of the overlay with soapy water, I would try and line up the overlay by myself.  Trying to do it with two people was too stressful, and probably caused the artwork not be square by a degree or two.  It is noticeable, but I ended up using acrylic black paint to cover the most noticeable of the areas.

Saturday, it was time to start auto clear coating the playfield.  I used Clay’s directions on this link.  Any information that Clay provides is a godsend.  He is the original god of the internet on how to repair pinball machines, and please donate to him if you find his information useful.

So I don’t want the fumes in the house so I set up a tent outside to do the auto clear.  The tent has mesh to minimize the amount of pollen that can get onto playfield.  After finishing two coats, I feel that it is a good option for brushing on auto clear.

Paint Tent

Paint Tent

Playfield in Tent

Playfield in Tent

So Clay says when spreading the auto clear to go from the shooter lane to the left side of the playfield, and then turn the brush over and spread from the left side of the playfield back to the shooter lane.  I found that skipping the shooter lane entirely and doing it at the end after finishing the rest of the playfield worked best for me.  (If I hit the shooter lane low point with a full brush, it would drop a lot of the clear coat into the ditch.  I had to clean that out with the brush at the end anyway, so just avoiding it worked out better).  The second thing I found was that even if Clay says to not got over it again, if you see a bubble, you should make sure that you fix it with the brush using a full stroke across the playfield.  In that way I first did the flat section of the playfield starting just to the left of the shooter lane.  Then at the end, I went straight down the shooter lane to clean the extra clear coat that was deposited when I started the brush to the left of the shooter lane. In that way, I didn’t get any starting/ending brush strokes.

Brushing on clear coat is definitely not going to be as flat as spraying it.  I believe that it will be good enough to play well, but there are definitely going to be some waviness that the ball will ride over.  Spraying simply gives you a much more even application of the clear coat.

Next week is going to be spent repopulating the playfield.  Hopefully next weekend another big update will happen.

5/18/2015, Just when things were going soooo well

I was originally considering using auto clear on the cabinet and the playfield, but after reading all the warnings, I decided it would be easier to simply polycrylic the cabinet.  Polycrylic is not nearly as hard, but I can also work on it in the basement without killing the family with the fumes.  (When you read the warnings on the auto-clear it causes things like blindness, permanent lung damage, etc.  You need to use swim goggles and a respirator when applying it even with a brush.  If attempting it yourself, read every warning that you can find and take it into consideration.  Auto clear is scary, scary stuff and don’t use without the proper precautions.)

So it is time to polycrylic the cabinet.  I did  a quick test on a piece of the clear vinyl that I had leftover from the cabinet.  I used 400 grit sandpaper, 600 grit sandpaper, and no-sandpaper to rough up the surface.  The polycrylic stuck to all the surfaces really well, so that didn’t seem to be an issue.  With the 400 grit sandpaper, I could still see small scratches from the sandpaper after the first coat.  (I tried to take a picture, but the scratches are so minor that I couldn’t get a clear enough picture).  The 600 grit sandpaper worked the best.  The surface without sanding worked well (i.e. good adhesion), but I felt that the polycrylic coat was really thin.

With this information in hand, I decided to start sanding using 600 grit.  As soon as I rubbed the sanding block across the side of the backbox, I noticed that the printing was coming off the overlay.  I assumed the overlay was layered as follows:  vinyl, printing, glue.  It turns out it is printing, vinyl, glue.  It completely makes sense because that would be easier for them to manufacture, and they wouldn’t need to do a separate step to add glue to the vinyl.  They would simply buy it in a big roll.  With that additional information, sanding was not a possibility, and now the sides must be clearcoated to protect the printing.  Not much of an issue, but something that must be considered.

That took up most of my Saturday, so I was blocking out my whole Sunday to put on the playfield overlay.  Attaching that overlay should only take 15 minutes, but I wanted to make sure that I was not rushed in any way.  When Sunday rolls around, I get everything set up, and start putting down the overlay.  Within 5 minutes, I realize that the overlay is not printed in 1:1 ratio with the file I sent.  The center stuff lines up well, but they have stretched the art in both directions.  I went back and reverified everything and insured that the file I sent them was 100% correct.  I now have a trouble ticket open trying to figure out what went wrong with the printing.  Strangely, the overlay is really the last thing that I don’t have completely under my control.  I’m not sure what the resolution is going to be at this point.  Here is a picture of the issue:

Not 1:1 print

Not 1:1 print

After being in a very disappointed mood for the next couple of hours, I decided I had to keep getting stuff done.  I sent in a trouble ticket for the overlay.  That’s as much as I could do on a Sunday with that issue.

Next up were side rails/legs.  There is some surface rust on them which needed to be cleaned off.  I tried the old coke/aluminum foil method and it work like a dream.  I was completely surprised…and in a good way.  I can definitely see how this would not work if it was more than just surface rust, but for those times when there is a small amount of surface rust, it works wonderfully.  Here is the link to the pinside thread talking about it.

Last up, I worked on the speaker panel some more.  A couple more days and it should be finished.  I’m gluing the fake leather to the plywood, and so I do one small section, clamp it, and let it sit for a couple hours.  I repeat that with the next small section.  It doesn’t take that long, but there is a lot of waiting for it to dry.

5/13/2015, Prepping playfield for overlay

Spent the weekend prepping the playfield for the overlay.  The overlay was delivered on Tuesday, so that meant it is time to get crack-a-lackin’ on the playfield.  Most of the prep was done last weekend (masking off the inserts), so this weekend was a couple layers of Kilz, and then a quick layer of polyurethane.  The Kilz went on very nicely, and gave me a nice white backing.  The polyurethane went on nicely, but after a couple days of curing, it has already turned slightly yellow.  What?  I’m disappointed because it would have looked best with a pure white background, but now it has a yellow tinge to it.  Maybe I should have stopped after the Kilz layer.

Here’s a quick picture of the sprayed playfield:

White Playfield (small)

I spent a half hour last night sanding everything as smooth as possible, and removing some of the polyurethane to lighten it up.  The reality is that it won’t matter much, but it definitely means that I need to use either a different polyurethane or try to spray on the polycrylic that I’ve been using.  I’m going to do a test spot using the polycrylic to see what that looks like over the overlays.  Maybe that is clearer.

Spent time trying to clean up some of the electrical.  The temporary current limit resistor worked and prevented the power supply from cutting out.  I was running at 48V which was giving me a lot of airballs, and was seriously overpowered.  I dropped the voltage to 36V (by simply removing one of the power supplies), added the current limiting resistor and bulk cap on the 36V in the backbox.  That should make the game play a little more realistically.

So I’m not as jazzed about the overlays that I got from banner buzz this time.  The overlay for the playfield was bent, and I know from doing the cabinet overlays, that a bend will be visible.  The overlay that I’m using for the backglass has the adhesive on the top so that it can be applied to the inside of the backglass.  That one shows a lot of wrinkles and doesn’t lay very flat.  I’m currently allowing them to relax in hopes that they will be a little more flat when I try to apply them.  I would rate my satisfaction as 3 stars out of 4.  The only reason that they get that high of marks is that they are very cheap.

The initial version of the rules are now implemented and in the repository.  I’ve simulated walking through all eleven modes, and they all work as expected.  The modes are supposed to each have four different difficulty levels, which are not currently implemented.  I still have a lot of little things that need to get implemented in the code, but as soon as the playfield is together, it should be ready to start actual play testing.

Programming the rules went pretty well.  I had a couple of sleepless nights, so why not spend the time programming the rules.  The goal was to get them done by the end of the month, so at least that is ahead of schedule.  I have to start figuring out how to get all the callouts done that I need.

Working on lots of crappy little details.  Speaker panel is coming along well.  Cut the coin door hole a little larger so the coin door I have will fit, etc.

This weekend the playfield overlay will be installed.  Next, I need to figure out how I want to deal with the clear coating.   It will be good to start putting the machine back together.  Less than two months to the show.

5/6/2015, Added Pinball Framework simulation video

One of the main goals for May is to get most of the rules for the pinball machine programmed.  Tonight I finished coding entering a mode, selecting it, and programmed the first mode.  It was a good time to take a break from coding and do a short video.

I’ve discussed the pinball framework and how it can be used as a simulation environment to program the rules.  Right now, the top of the SS3 playfield is disassembled waiting for the overlay to be received.  That means that I can’t test on real hardware.

By passing a flag into the PinballFramework, it simulates all the hardware that it finds in the rules file.  That allows the software to be developed on simulated hardware while waiting for the machine to be fabricated, or like in my case, writing the rules while waiting for things to arrive in the mail.

The audio is atrocious in the video.  Way too quiet.  I should have used my headset microphone instead of laptop’s microphone because moving my head really affects the volume.  (The volume is also too quiet)

Hopefully the next video will be better.

5/3/2015, Attached cabinet art and masked playfield

Updates are going to start coming a little bit more frequently at this point.  I have about two months and a week to finish this project up.  It is definitely going to be a sprint to the end.

At this point, all of the overlays have been ordered.  The last group includes front cabinet art, backglass art, and playfield art.  Since the playfield art will be easily seen in all the videos I’m going to do, I’m not trying to hide it.  Joe came through and finished the playfield art, and it was ordered early last week.

I ended up using the wet method to install the overlays on the cabinet.  It is exceedingly forgiving, and it worked out perfectly.  This is the link that I used as a reference:

One thing that I learned is that the overlay shows all the imperfections on the surface.  I used a foam brush to apply the paint and the polycrylic overcoat.  This meant that there were brush strokes because both the paint and the overcoat are rather thick.  I assumed that the vinyl overlay would be thick enough that none of the imperfections should show through.  It turns out, that I can definitely see the vinyl conforming to the brush strokes, so that the sides of the cabinet would not be flat enough for the playfield.  Luckily the art contains planks of wood, and it simply looks like wood grain, but it was a good test case to really understand how smooth the paint needs to be.  If I had to do it over again, I would sand much more aggressively between coats, and I’m starting to think the only way to get a truly good flat coat is to use a paint sprayer or spray cans.

So when we last left the playfield it was clearcoated, but I realized that I needed a white base coat so that the art would pop.  Yesterday I spent the time to mask all of the inserts, and block all the holes in the playfield.  I’m going to use two coats of Kilz primer to change the playfield to white.  Then I’ll remove the tape over the inserts and spray a layer of polycrylic.  After sanding that flat, I’ll be ready to install the overlay on the playfield.  The art should get here in week or two, and I should be ready for it as soon as it arrives.  To mask off all the inserts, I backlit the playfield with a 100W lightbulb again, and put painters tape over each overlay.  I then used an xacto knife to cut the tape around the inserts.  Here’s a picture of the playfield with inserts masked, holes covered, and the places that I want the wood to show through masked off.

PlayfieldMaskInserts_sm

Before masking off the playfield, I took the last template that I made and marked every single hole on the playfield.  This should enable me to easily find all the holes after the overlay is installed.  (Here’s a quick picture of all the holes marked in the correct positions.)

GE

Finally, here is a low resolution picture of the playfield art:

ss3_playfield_art_small