Monthly Archives: May 2017

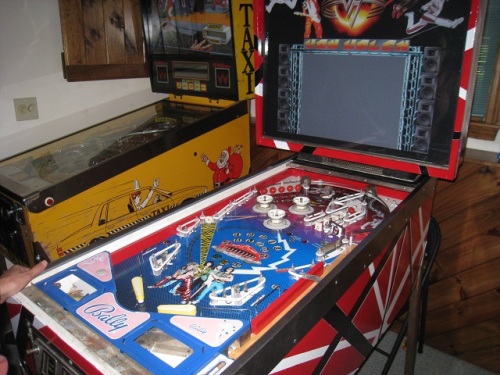
5/30/2017 – Van Halen, White Wood Mode

Just threw up a video of Van Halen in white wood mode on youtube.  This was literally the first time that a ball has been placed on the playfield.  I don’t have any of the solenoid kicks adjusted properly, and while taking the video, I got a phone call.  Many more professional outfits would retake the video, but not me.  We, here at OPP headquarters, (i.e. my basement) let you see all the warts and issues as they occur.

That being said, all the solenoids were firing properly.  The outhole needs a little more umph to get it into the inlane all the time.  Very nice first step.  There have been literally no changes to the Dolly Parton wiring, so I’m pretty psyched.  The main goal of this machine was to prove that the OPP hardware could drive a machine with no changes to the wiring harness.  Check!  I need to come up with a way to attach the connectors more securely to make sure that they don’t pull out from the interface card.

I removed all the GI lights because they were causing the camera to just see those bright spots on the playfield.  Still a lot of work to go, but, things are finally starting to get there.

5/19/2017 – Playfield Repopulated

I found another picture of the playfield being wet sanded.  Wet sanding works incredibly well, and keeps the sand paper from getting clogged.  I can’t remember if I mentioned it before, but I used 600 grit, then 1200 grit and finally 2000 grit.  I then rubbed out the playfield using Novus #2.  I finally used Novus #1 because, well, I have it around and why not use it.  Most of the playfield is really, really smooth.  There are some small areas where I should sanded it down a little more, but, I unfortunately didn’t notice it until I was done with the sanding and had started to move onto the next step.

Wet Sanding

Spent the last couple of days repopulating the playfield and putting everything back together.  It went well.  The many pictures were useful, and I could normally even find which exact screw went where.  Using plastic bags to separate the playfields into different areas also made things really easy, because I was never looking at a large pile of parts wondering where all of the went.  Here is the money picture with the playfield back in the machine.

Playfield Repopulated

As you probably notice immediately, I forgot to paint the apron.  Not sure if I’m going to paint it or not…my wife says it doesn’t look bad the way it is.  The blue does actually match nicely, but the pink is pretty awful.

The plastics aren’t done yet, but I have ordered a sheet of PETG from McMaster-Carr.  They ended up being the cheapest, and after calling and asking how much shipping would be, it was the hands down winner.  Mark used to order stuff from them every couple of days for work, but I always feared ordering from anybody that will send you a steel I-beam if you need it.

Just a couple of minutes ago, I measured the voltages coming off the transformer.  (Remember, this machine has not been powered for six years, and before that, I only played two games before deciding the MPU board was too acid damaged to revive.  I really don’t have a lot of experience on the machine proving that coils are shorted or any other issues.)  I did correct a lot of issues on the machine from the previous operator.  All broken parts have been replaced, and anything that was jerry rigged has been fixed properly.  All the generated voltages are correct.

I did pull fuse #2 on the rectifier card next to the transformer.  That is the fuse that generates the 240 VDC for driving the displays.  I want nothing to do with that type of voltage, and since everything is going to be done with a monitor, there is no reason for it.

Now I just have to get past my worry about turning the power onto the playfield for the first time.  How many checks do I need to complete before I feel comfortable enough to flip the switch?

5/16/2017 – Reassembly

Last couple of days have been busy.  First up was to clean off the backglass.  I had removed the paint using a razor blade, but that didn’t seem to work on the gold layer that was right next to the glass.  I started out trying to use common household cleaners, but it turn out that the scrubbing pad I was using was causing a haze on the glass.  After trying every cleaner I had in the house, the winner was Cerama Bryte.  It got rid of the gold without scrubbing.  The trick was to spread it out, and let it dry.  Then rub it off with a paper towel, and the gold fell right off.  Reading the back of the bottle, the active ingredient is citric acid, so there are probably a ton of different cleaners that would work.

Cerama Brite Removes Gold

So at the same time I was working on the backglass, it was time to work on clear coating the playfield.  I used an xacto knife to cut out all the holes in the playfield.  I’m using the two part auto clear and brushing it on with a foam brush.  Of course it has really nasty fumes coming off it so you need to wear a respirator and swim goggles.  I ended up putting four coats of clear on it.  I mixed up 3 oz at a time which is good for a single coat (2 parts of the clear, and 1 part of the activator).  I followed Clay’s directions and went from the right side of the playfield to the left, then turned over the foam brush, and immediately went back.  I worked from the top of the playfield to the bottom of the playfield.  Each coat takes about 10 minutes all said and done, and then it cures for 4 or 5 hours before another coat can be applied.  I did the four coats over a two day period.  Clay warns that you can’t wait more than 24 hours because it cures so hard that the next layer can’t adhere to the previous layer.

I then applied the vinyl to the backglass (it is white vinyl that is normally applied to the inside of a window).  Used the wet method again.  I bought the vinyl from Banner Buzz and after shipping there were definitely some “crinkly” places in the vinyl because the backing paper being applied and rolled tightly into a tube.  Even relaxing the vinyl for a full week didn’t help it.  It might be that fact that the only way to get it perfect requires you to buy it locally.  The price for a local print vs a print from India is pretty big.  I paid about $65 for the art, and locally, I’m sure I would have paid about $200 for the same amount of vinyl.  Finally the backbox and cabinet were  reassembled.  Here are pictures as it currently stands.

Tomorrow looks like it is time to wet sand out the clear coat, so reassembly of the playfield should be happening either Thursday or Friday.  I really have to start coding some rules soon.

5/13/2017 – More details on applying vinyl

My last entry didn’t really have much valuable information.  I don’t want this blog to simply be about making a pinball machine, but helping others to follow the correct steps to make a pinball machine easier for them.  So here are some quick tips.

Relax the vinyl for multiple days.  When I received the vinyl, I immediately removed it from the tube and laid it flat.  Side rails make nice weights to keep the vinyl flat when it is relaxing.  I let it lay flat for about three days which really worked well.  I believe that two days would have been sufficient.

Used the wet method to allow vinyl to float while placing.  I made up a spray bottle with a couple cups of water and two dashes of liquid dish soap.  I used a generous amount of water on both the bottom of the overlay and on the top of the playfield.  Don’t be stingy.  The more water you use, gives you that much more time to get placement right.  Then, when everything is lined up, squeegee from the center of the playfield towards the edges.

On art, holes should not use dark circles, but should simply continue the artwork.  That way if placement is a little off, it won’t be noticeable.  Same thing with slots and holes for kickers, etc.  There are plenty of inserts around, and those are really what matters for placement.

Holes should be on a separate layer on the art to make this process a lot easier.  That way you could print a vinyl with the holes highlighted, then simply turn off that layer when printing the final version.  I did a test print at kinkos of the playfield, but the test print was on very thin paper.  Even using light to show from the bottom of the playfield, I couldn’t see that the inserts were 1/8 inch off.  I really needed to print a clear overlay with just the location of the inserts.  I could have easily done that before Joe did his artwork or even while Joe was doing his artwork and done that in parallel.  Completely my fault, but I assumed the stitched image was going to be spot on.  The reality is, that it is about .6% off.  Truth be told, that is absolutely amazing, but it isn’t quite good enough for a playfield overlay.

Assume you will need to print two versions of the vinyl, but three would be that much safer.  Vinyl takes about two weeks to receive using express shipping, so assume that you must have at least a month for that portion of the build.  As stated above, it can be done in parallel with designing the artwork.

There is another possibility for the art error which is that the print is not perfectly sized.  I should have put a border around the playfield art at an exact measurement of inches.  As it was, the art went right to the edge of the print.  If the printer modified the art slightly so it could be printed on their machine, it would show the same errors that I’m seeing.  Again, my belief that the scan would be perfect was probably too optimistic.

This morning I used an xacto knife to cut out all the holes in the playfield, then applied the first coat of auto clear.  Tomorrow morning I will apply a second coat of auto clear, and finally, tomorrow night I will apply the third coat.  I might go for a fourth coat, but it really depends on what the third coat looks like.  I think on SS3, I applied three coats.  The first coat of auto clear makes the colors pop that much more.  Nice!

5/12/2017 – Overlay applied

Got a chance to apply the overlay tonight.  It went much better than the previous one, and the overlay looks spectacular.  The colors really pop with the art that Joe did for this one.

As you can see in these close ups, the scans did not match up perfectly.  There is about 1/8 of an inch offset at some points, and I tried to split the difference to make it as good as possible.  If we had a good amount of time, I would probably do a second print and move the inserts just a little bit to get things perfect.  I think it is just one of those things, that since I put it on, I really notice it a lot, so it bothers me.  I look at production machines, and there are definitely issues that are on those when you get close look at them.  I guess my suggestion is if this is for a project that you have been working on for 5 years (I guess I’m talking to Mark (Nightmare Before Christmas) if he reads this blog, be prepared to do at least two printings to make sure that everything lines up perfectly).  I believe that he also scanned his playfield with the hp4600 and he will see the same sort of issues (i.e. off by 1/8 inch or so in certain sections).

These close up pictures emphasize the offset because I’ve zoomed into them.  Over all, I’m very very happy with how applying the overlay went and the art.  (One more time that my wife talked me down from the edge).

Next up is auto clear coating fun!

5/7/2017 – Prepped for Vinyl Overlay

So the white coat of Kilz is down, and I sanded it with 600 grit sandpaper.  I would have loved to wet sand it so that I didn’t have to keep switching sandpaper because it was getting gummed up, but I didn’t want to clean up the mess that would make, so I just burned through the sheets.  (Burn ’em if you got ’em).

Here are a couple of quick pictures of the current state of the playfield.

The vinyl overlay is supposed to come in on Tuesday (5/9/2017), so right now, everything is prepped and ready for that.  One of the most stressful things is trying to apply the overlay, and to get it perfectly aligned.  My wife loves when I ask her to help me with that.

I’ve been spending a lot of time working on the Pinball Framework to support the switch matrix.  I now have everything displaying in the simulator properly, but I can’t simulate switch inputs from the switch matrix yet.  Just need another couple of hours to implement and test it.

So the OPP Pinball Framework is based off Pygame.  Pygame is well, not that great, which is why better frameworks (i.e. MPF) have moved away from Pygame.  Since I’m only trying to emulate early 80s games, I think of it as good enough for me.  I would eventually like to move to MPF, but because of time constraints, I can’t do it on this project.

One of the issues with Pygame is how it deals with sounds.  It is really, really, picky.  Joe hands me most sounds as MP3 files.  I convert them using Audacity and export them as wav files.  If you export them as “WAV (Microsoft) signed 16 bit PCM”, Pygame can’t play them.  (It just makes a clicking sound).  Instead, choose to export them as “Other uncompressed files”, and make sure that the Project Rate (Hz) is set to 44100.  That will make it so the sample will play properly.

Here is a quick Pygame code to play a sound.  I use this to verify samples are working properly so I don’t have to run the whole framework.

#!/usr/bin/env python
import pygame
import time

pygame.init()

# display.set_mode is necessary for Pygame to properly initialize
pygame.display.set_mode((200,100))
pygame.mixer.init()

# Relative path from directory where program is started
soundPlyr = pygame.mixer.Sound("New/musicFile.wav")
soundPlyr.play()

# Sleep so sample will play before closing out Python program
time.sleep(5)

That is about all for today.  I currently think things are on track for being ready for Pintastic in about two months.

5/2/2017 – Theme is revealed

Well the cabinet painting is done, so now let’s see if you can guess what the theme is going to be.  Here are some pictures of the cabinet.  (This is before I did a little bit of touch-up to where the paint infiltrated below the tape.)  In person, the cabinet is really shiny which is exactly the look that I hoped to achieve.  As stated in the last blog entry, I really like painting with Rustoleum enamel paints.  They really laid nice and flat even though I was painting on a vertical surface.

What is the one thing that we don’t have enough of in pinball?  Yeah, that’s right…late 80s rock bands.  It is Joe’s dream theme, so he is really taking the lead on this project and its direction.   Do you have a guess now?

Well here are some reduced size images of the artwork.  (I reduced the images because the full sized images get to be really large and my computer gets a little unhappy with trying to display them.  GIMP ends up working best for working on the images).  For the original images sent to Banner Buzz, the art is 300 dpi x 300 dpi.

I think that my favorite part of the images is the halftone that Joe did on the playfield.  It looks really great with the full sized image and how it transitions between the different colors.  He also did a great job making the people in the band on the playfield look like cartoon characters.  Top notch!  The Banner Buzz order went out on Monday night (5/1/2017) and I should receive the vinyl overlays by 5/9/2017.

The backglass and plastics vinyl stickers are on white vinyl with the adhesive so that it can be placed on the inside of a window.  The playfield is on clear vinyl with the adhesive so that it can be placed on a flat surface.  All said and done, all the artwork cost about $65 including shipping.  Quite a good price.

So with artwork ordered that means that I need to get the playfield prepped for the vinyl overlay.  Tonight, I masked off all the inserts using tape and cut around them with an exacto knife.  I will use a spray can of Kilz to lay down a layer of white paint where I don’t want the wood to show through.  This will make the vinyl playfield overlay pop as much as possible.

I still need to use some cotton and a little more tape to protect holes and the incandescent bulb sockets from getting paint in them.

In a last bit of news, on Sunday, 4/30/2017, the Pinball Wizard Arcade closed.  I was there for the last night, and met many great friends for one last night of pinball.  I wish Sarah St. John all the best.  Running an arcade with 200 pinball machines is a huge undertaking.  She was there six or seven days a week for the last six years.  I hope she made enough to retire.  While I sometimes complained about the price of the games, it was great to have a location with that many good machines in that good of shape just up the road.  It will be missed by all the pinball players in New England.  We will never again be able to have a New England Pinball League (NEPL) with 170 people battling it out to see who is the best in a single day.  Now finals will only be for 32 people.  It just isn’t the same.  Best of luck, Sarah!